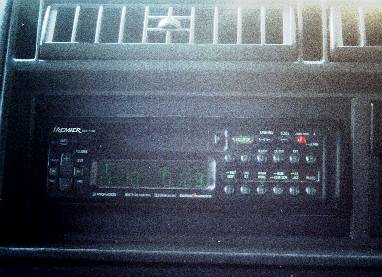
sorry for the poor image quality, this is what the deck looks like installed with the Crutchfield kit
The sound system is using a combination of parts from various sources. It's not all that loud, or bassy, but it had plenty of kick to hear when the windows are open on the freeway, and it really makes the miles go by quick. Total power is about 260 watts, and about 14 speakers, counting the center tweeters in co-axial speakers.
sorry for the poor image quality, this is what the deck looks like
installed with the Crutchfield kit
MAIN DECK:
Is a Pioneer KEH770. It is probably one of the most loaded cassette decks around. It has logic control, and Dolby C. It has CD changer control, and a High-power amplifier. A pretty cool deck. Since I've got a lot of record albums, the nice cassette deck comes in handy because I can listen to copies of my records while driving. The CD changer is a 12 disc model that will give you hours of tunes. My problem is that I forget what CD's I've put in the changer! This deck allows you to change the color of the screen to fit your dashboard. I chose green, since that goes good with the blue. I just wish it would do blue.
To install a standard DIN size stereo in the Astro van requires a mounting kit. There are two types of mounting kits for GM vehicles. One that requires no modifications, that make the deck poke out about an inch or so, and another that will mount it flat with the surface of your dash. The problem with the flat one is that it requires you to cut out the rear support for the old DELCO system. If you are not planning on getting rid of your van soon (and putting the DELCO back in) I would go with this mounting kit because it looks so much better. Crutchfield, out of Charlottesville Va has both mounting kits avaliable, along with the wiring harness plugs in a kit for $18.
Another note about the Pioneer stereos. There are two power lines going into the stereo. A "always hot" and a "switched" line. Most stereos power themselves off of the switched line, and just use the "hot" line to save the memory and clock. The Pioneers do the exact opposite. The switched line is nothing but a signal line for the deck to turn on. The HOT line carries about 8 amps of current that runs the high power amp. I mention this because if you are wiring the stereo up to a hot circuit, make sure that it has enough capacity to handle the stereo. I chose to tap off of the cigarette lighter circuit, since that is rated for 30 amps. If you really want to do it right, you can run a line straight to the battery!
AMPLIFIERS / SUBWOOFER:
I was given a 200 watt JBL
amplifier
from a friend with a burned out power relay. I just went inside and
bypassed the relay. The amp now does not turn on automatically with
the deck, but I just ran a line from the battery, and put my own relay,
and a switch on it to do the same (see the electrical upgrades page for
details). This amp just handles the bass frequencies, so it really
doesn't work too hard, especially since I normally don't turn the bass
up that high. It is actually a 4 channel amp bridged to 2 channels
and driving a Polk audio C4 box. The box normally contains
4 6X9 speakers in a bandpass arrangment, That box was also
given to me, but without any speakers in it. So I bought some JBL
6X9
speakers to install in it. The only problem I am up against now is that
the cabinet is a little small for these speakers. It only becomes
a problem at frequencies below 35hz, and if you turn the subwoofer boost
past 6db. As mentioned before, I don't like my music over-bassed,
so it's not even noticed, except for on some of the pipe organ music I
have when turned up loud.
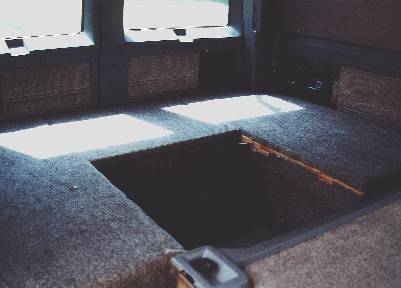
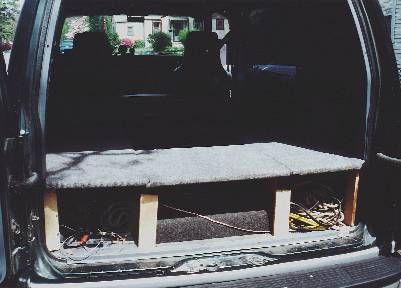
These pictures show how the subwoofer cabinet sits under the bed seat
in the back. From the inside picture, it cannot be seen, from the
back, it can be partially seen in between the two middle support braces.
MAIN SPEAKERS
The main speaker systems are a mix of speakers from various sources and manufacturers being driven off of the high-power amp built into the deck. The front speakers are the factory 6X9 premium sound DELCO/BOSE speakers. They are basic 2 way, and they have the little BOSE logos on the middle. They really don't sound bad at all with enough power behind them. When I bought the van, I tried to get my nice JBL 3 way 6X9 speakers to fit, but the speaker openings are only 3 inches deep! Plus you can't install any speakers in the dash of the Astro where the tweeter pokes out past the top edge of the woofer. This will keep the factory cover from going back on, or if you could get it on, it would bulge in the middle where the tweeters poke out.. Thanks GM for the big speakers, but no thanks on making the upgrade path so limited! Getting the grille off just requires a flat screwdriver, or a small puddy knife. You will need a 1/4 inch wrench to get the speakers out, preferably and offset wrench, because the screws on the far side are too close to the windshield to get a screwdriver onto.
The back OEM speakers in the door were blown, so they had to come out! I chose a Cerwinn Vega kit separate kit which came with a 6 inch woofer, a 1 inch titanium dome tweeter, and a 3Khz crossover to replace them. The 6 inch woofers, of course, went in the doors, while the 1 inch dome tweeters were installed up on the rear posts, just below the OEM 4 inch tweeter. I wired the crossover in so that both the OEM tweeter, and the new dome tweeter are fed at the same time (the 4 inch acts more as a midrange). This is an excellent way to wire up the system, and it sounds great. There's plenty of room on those rear posts to install all kinds of differrent speakers. If you don't have the rear AC system, there's about 3 inches of depth behind the post for installation. These grilles just pop off with a flat screwdriver too.
Installation of the 6 inch speakers in the door involve a little disassembley. Also, make sure you get the "S" size speakers. These have the mounting holes spaces a little bit farther apart. These speakers are actually closer to 7 inches than 6 because the mounting holes. The speakers are actually mounted to the doors from the back side. To get at these, you need to remove the speaker grille from the back door with a flat screwdriver. The door skins need to be removed, with about 6 phillips head screws mounted on the outside edge of the door. Once they are out, you can remove the speakers' screws, and pull the speakers out by reaching your hand around from the back side. (Helps to find someone with skinny arms to reach in!). You can then put your door back together, and mount your new speakers to the front of the plate. Clearance isn't too much of a problem here, there's about 4 inches depth behind the opening, and the mounting plate is recessed about 1/2 inch, which helps if you want to add speakers with center mounted tweeters.